What Wikipedia Can’t Tell You About Wordless Picture Books

WHY WORDLESS PICTURE BOOKS?

Wordless picture books are a creative addition to any library. These are books which have only a few or no words. Here is why they are important for you and your child:

  • They help with oral language development.
  • They teach, through the use of illustration, how having one image after another can generate and change meaning.
  • They encourage children who struggle with reading.
  • You can be creative with the story by changing it every time you read it.
  • Wordless picture books promote critical thinking and questioning.
  • These books can be read in any language which is perfect for multicultural families. Being so inclusive, they can even be used in the classroom.
  • A University of Waterloo study suggests that wordless picture books can increase a toddler’s vocabulary more than traditional ones because, when reading them, parents use more complex language.
  • They encourages the reader to use different voices and facial expressions.
  • They spark the imagination.
  • Wordless picture books bring out creativity in adults!

OUR FAVORITE WORDLESS PICTURE BOOKS:

***Disclaimer: This post contains affiliate links, and if you decide to purchase anything from suggested links or companies, I may receive a commission. Recommended products are either things I love using or think would be helpful for you. Making your purchase using these affiliate links helps keep this site running, so thank you kindly!

Wordless Picture Books Hug by Jezz Alborough  Mon lion (My lion) Mandana Sadat  Tuesday David Wiesner Flotsam Dov’è l’elefante Bareaux Flashlight by Lizi Boyd  Time Flies by Eric Rohmann Wave by Suzy Lee  Journey by Aaron Becker  Chalk by Bill Thomson

  1. Hug by Jezz Alborough – Only using 3 words, this endearing book focuses on various emotions. Perfect for preschoolers as they learn about their feelings. We found ours at a library and Adèle loved the character so much that we ended up buying this book for her collection. It’s the first book she read on her own. The 3 words are written in larger font and repeated many times, making the book easy to read for a beginner reader.
  2. Mon lion (My lion) – Completely word-free, this is a graphic masterpiece. This beautiful story takes place in Africa and illustrates a friendship between a boy and a lion. The story can be read in a multitude of ways and promotes curiosity and imagination.
  3. Tuesday – Another book with only a few words, this one is by the renown David Wiesner whom I was lucky to meet at a SCBWI conference many years ago. He signed Tuesday for me and now Adèle is the one who enjoys reading it. This highly original story with beautiful illustrations deserved the Caldecott Medal. Other award-winning wordless picture books by David Wiesner include Flotsam, and Mr. Wuffles!
  4. Dov’è l’elefante (Where is the elephant?) – A simple question encourages the child to find the elephant and his two friends and also serves to raise awareness for the respect for the environment. Inspired by deforestation of the Brazilian rain forest, this simple yet powerful story is not to miss.
  5. Flashlight by Lizi Boyd – ideal for pre-bed-time bonding (with or without a flashlight).
  6. Time Flies by Eric Rohmann – Another Caldecott Medal winner, this book is about dinosaurs and birds.
  7. Wave by Suzy Lee – A cute book about the beach.
  8. Journey by Aaron Becker – A Caldecott Honor Medal winner about a girl who draws a magic door and escapes into a wondrous world. This one is for older kids as some of the subject matter might not suit little one’s mental development.
  9. Chalk by Bill Thomson – This one is what my blog is all about – magical chalk making drawings come to life on a rainy day!

TIPS ON HOW TO READ WORDLESS PICTURE BOOKS

  • Describing each image.
  • Describe what happens between each page.
  • Point out details.
  • While looking at the images, change the words you use.
  • Create a new story based on the same illustrations.
  • Use different facial expressions and voices.

CREATIVE ACTIVITIES INSPIRED BY WORDLESS PICTURE BOOKS

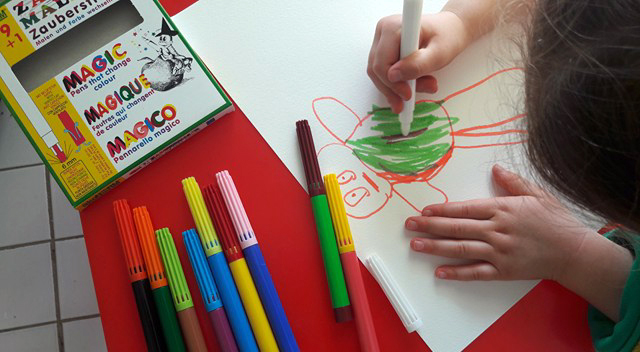
  • After reading a wordless picture book, have your child make an artwork and then ask them to tell you about it. Ask them who they drew or what the story is. Ask them what is happening. For example, older children can make 3 or more images with the same character in each.
  • Have your child read wordless picture books to their toys or pets.
  • Act out the story or scenes from the book.
  • Make a simple, mini, wordless picture book from a sheet of paper.

Do YOU have any favorite wordless picture books? I am always looking for new ones, so please let me know if there are any we need to add to the library.


Creative Mindfulness Activities to Stop Tantrums and Improve Sleep

WHAT IS MINDFULNESS?

In a nutshell, mindfulness is our ability to be fully present in this moment, in the “now.”Marti Naturalmente Crescendo Italy Salt Pool Mindful Moment

WHY SHOULD CHILDREN PRACTICE MINDFULNESS?

  • There is a lot of research which shows that mindfulness can help with regulating emotions, focus and decision-making.
  • When your child learns how to recognize and address emotions, there will be fewer meltdowns and tantrums and that will make your life less stressful as well.
  • A mindfulness practice can significantly reduce anxiety and improve your child’s sleep.
  • Children are born with the natural ability to be present in the moment. They don’t understand the concept of time and live in the now and here. It is us, adults, who constantly try to take them out of the present moment. Most of the time we are not even aware that we are doing it. We talk about yesterday and tomorrow. We plan ahead or worry about the past. Every single little thing like this removes the child from “now.”
  • Practicing mindfulness early on will create healthy connections in the brain and aid your child’s emotional development in adulthood.
  • The more your child meditates and practices mindfulness, the greater the benefits will be.

Jellyfish Aquarium Montepellier MindfulnessAs a side note, if your child is learning mindfulness from you, that means that they will be spending more time with you – and that creates a connection. And if you are practicing mindfulness with your child, then you get to reap the above-mentioned benefits as well! Also, it’s never too early nor too late to start. The best time to start practicing mindfulness is NOW. ;)

MINDFULNESS ACTIVITIES FOR CHILDREN

***Disclaimer: This post contains affiliate links, and if you decide to purchase anything from suggested links or companies, I may receive a commission. Recommended products are either things I love using or think would be helpful for you. Making your purchase using these affiliate links helps keep this site running, so thank you kindly!

Children can be children only once, so how can you preserve their childhood without having them rush through it too quickly? Here are a few simple exercises you can try:

  1. Make Suminagashi art! – It’s a great way to teach about emotions and perfect for art therapy. To read my post about this mindfulness art activity, click here.Buddha Board
  2. Buddha Board – a mess-free, meditative art activity. It comes with a brush and needs only water to work. The image disappears as you paint and so it’s also a great way to illustrate impermanence and change. We also have a Buddha Board Mini for when on the go. The surface is fragile, however, and should not be scratched or used in a way not intended. For this reason it is most suitable for older children and adults.
  3. Take mindful walks. Smell flowers or other plants.blowing dandelion
  4. When experiencing an emotion, encourage your child to lie down and place their favorite toy on their belly. Tell them to breath and guide them to focus on the toy moving up and down on their belly. This might not work when your child is experiencing a big emotions, but if they are willing to try, it will calm them down. And over time, they will look for their toy when an emotion arises.
  5. Listen to  birds or insects outside. Help your child pay attention to various sounds around the house.watching bees
  6. While eating, bring your child’s awareness to the five senses. This way they can eat mindfully, too.
  7. While lying down, have your child close their eyes. Next, instruct them to squeeze various muscles in their bodies as tightly as they can. Tell them to hold the squeezed position for a few seconds and then release.
  8. Use a snow globe to illustrate how emotions can cloud our view and what they look like when one is mindful and calm. My husband had an idea of putting Adèle’s photo inside a snow globe. We explained to her that when she shakes it and can’t see herself clearly, it’s what a big emotion looks like. But once she uses mindfulness and calms down, the snow in the globe falls down and her picture becomes visible again. snow globe mindfulness meditation
  9. Create a “quiet corner” in your house just for your child. It should be a space without any visual distractions. Encourage your child to use it as a “safe place” when feeling an emotion. Adèle’s “quiet corner” is in her bedroom and just has a very small table with a cushion in front. On this table she placed her snow globe mentioned above. This is how she uses it: “When I feel sad or having an emotion, I go there, in the quiet corner. I look at my my snow fall. There is a picture of my toy and I. It helps. It makes the emotion go back up into the sky.” – Adèle, 3 year old.
  10. Meditation at bedtime – guide your child through a body scan. As your child’s eyes are closed, tell them to bring attention to various parts of the body.
  11. Yoga classes for children, baby yoga classes or parent-child classes (whichever fits your situation).toddler yoga
  12. Gratitude journaling for kids who can write. Gratitude oral ritual for everyone else. Just have your child name at least one thing they are grateful for every day. Could be every morning upon waking up or just before going to bed. Let them decide when they want to do it, but help them build it into a routine.
  13. Books (see my recommendations below).
  14. A magical art activity that you can read about at the bottom of this post ;).

HOW TO ADDRESS YOUR CHILD’S EMOTIONS

Have you heard the term “Unicorns” and “Dragons” when referring to children? If you haven’t, these terms are quite widely used. Basically “Unicorns” refer to children who are easy-going and easy to take care of – children who are east to settle and don’t worry their parents too much. “Dragons” refers to kids who cry a lot and make parents feel very frustrated to say the least.

Well, I don’t believe in either. I don’t think children can be put into two categories like this. What I do believe is that babies and children have emotions and needs which they are learning how to express and it is our job to help them learn how to deal with those feelings as they arise (see some suggestions below). Children might make their caregivers feel frustrated or might make them feel relaxed. But if we call a child a “Dragon” or a “Unicorn,” then we are actually projecting our feelings onto children instead of dealing with our own emotions.child sitting on table feet together IKEA easel table chairsWhenever emotions arise, it is our responsibility to name their feelings and discuss them with the child. Children who are just learning about various emotions don’t actually know what they are experiencing (and that can be extremely scary for little ones!) so it is important to give those feelings names and explain what they are. This will also help you in your own mindfulness practice. 😉

For example, if your child is feeling angry, explain that the feeling they are experiencing is called “anger.” Describe what anger feels like using what is occurring in the present moment as an example. So if your child is stomping and crying, say “anger is making you stomp and cry.” If they are not receptive, patiently wait until they have calmed down and have a discussion afterwards. The important thing is to listen to your child and stay calm, focused and present. Learn how to manage your emotions so that you can help your child navigate through theirs.

4 PICTURE BOOKS THAT HELP IDENTIFY EMOTIONS & TEACH MINDFULNESS

Feelings by Richard Jones and Libby Walden, In My Heart: A Book of Feelings by Jo Witek, Illustrated by Christine Roussey, You've Got Dragons by Kathryn Cave and Nick Maland, The Color Monster: A Pop-Up Book of Feelings by Anna Leanas, Mindful Monkey, Happy Panda by Lauren Alderfer, illustrated by Kerry LeeMacLean, Sitting Still Like a Frog: Mindfulness Exercises for Kids (and Their Parents) by Eline Snel emotions mindfulness picture books

  1. Feelings by Richard Jones and Libby Walden – This book will encourage your child express their emotions and allow opportunities for wonderful conversations.  Rhyming makes it easy to memorize and the central illustration of a child is gender neutral. All pages are cut through (around the child) emphasizing the fact that one child has all these different emotions. With a very clever design and rich vocabulary, this book is suitable for kids of all ages. I also want to add a wonderful story about this book. We bought it in Italian, but I had a difficult time translating a few pages for Adèle. So, I contacted the author and asked her to tell me what she wrote on a few pages. Instead, she mailed Adèle the English version of this book as a gift (plus her newest one that I’m going to review in a separate post)! We feel so grateful for these generous gifts, especially because the books have been helping Adèle on daily basis and having an English version was such a beautiful surprise.
  2. In My Heart: A Book of Feelings by Jo Witek, Illustrated by Christine Roussey – Just before we moved with Adèle the first time, her best friend gave her this book in order to help deal with all the upcoming emotions. The illusions are simple and playful, making it easy for toddlers and preschoolers to relate to. The heart is die-cut and it is used as a tool to refer to each emotion. So, for example, instead of saying “I feel,” it says “my heart feels…”
  3. You’ve Got Dragons by Kathryn Cave and Nick Maland – In this book dragons represent worries, problems, fears, etc. The use of this metaphor works wonderfully and comes with practical advice. Whenever Adèle has a strong emotion coming, she can describe the type of “dragon” she is having and can use suggestions from this book to help the dragon go away. I found this book at a red bookshop for myself while visiting London before Adèle was even born. I collect well made picture books, and this one really caught my eye.
  4. The Color Monster: A Pop-Up Book of Feelings by Anna Leanas – Oh, this is such a simple book, and yet so powerful in its simplicity. It only focuses on the few most common emotions and associates each one with a different color. It’s  suitable for toddlers and preschoolers. The amazing thing is that because it is so simple, Adèle started to identify her emotions by color very quickly after reading it. And then I came up with the following art activity which works so beautifully to regular her mood. Curious? Here it is:
  • Teach your child to identify their emotions with specific colors.
  • When the difficult emotion arises and they recognize it, have them draw it with a color changing markers. It can just be a scribble or shading. Anything really, as long as they use the specific color of their emotion. (Note, I am not affiliated with Oekonorm in any way, but we love using their organic, natural art materials).Oekonorm color changing magic markers
  • Use the blender marker to change the color of their current emotion into the color of the emotion they desire.
  • Your child will now not only see how quickly their emotions can be changed, but also realize that they are the ones in control of changing their own emotions. And that is empowering! Furthermore, the activity itself becomes therapeutic and will take your child’s mind into a more positive space.

5. Mindful Monkey, Happy Panda by Lauren Alderfer, illustrated by Kerry LeeMacLean – I’ve searched for an age appropriate book about mindfulness for Adèle for months and found this one which is perfect for preschoolers and toddlers. It explains the concept of mindfulness in a very easy to understand way. We use the characters and phrases from this book to help Adèle stay in the moment. I have even used it successfully, as a reminder, to help her fall asleep at night!

6. Sitting Still Like a Frog: Mindfulness Exercises for Kids (and Their Parents) by Eline Snel – Designed for older kids and their parents, it’s one of the best introductory mindfulness guides on the market. It comes with a CD with meditations which help with a variety emotions such as anxiety and sadness. It can even be used to help your child fall asleep.

Duomo di Pisa Church Basilica Cathedral child lying on grassDo your kids have a mindfulness practice? If so, what is it like?

Easy Paper Making Activity: An Artsy Way to Encourage Picky Eaters or Inspire Kids to Recycle

PAPER MAKING: An Artsy Way to Encourage Picky Eaters or Inspire Kids to Recycle

DIY Handmade Paper with Flowers Recycled Paper

Did you know that trees do NOT need to be cut in order to make paper? For example, there is a company in Thailand that makes paper out of elephant poo!! This is possible because elephants are vegetarian and their dung is full of fiber which is what you need to produce paper. But you don’t need elephant poo to make paper, and the process of paper-making is something that is easily accessible to all.

***Disclaimer: This post contains affiliate links, and if you decide to purchase anything from suggested links or companies, I may receive a commission. Recommended products are either things I love using or think would be helpful for you. Making your purchase using these affiliate links helps keep this site running, so thank you kindly!

WHY PAPER-MAKING?

Making paper is an amazing learning opportunity and here is why:

  1. It teaches your child about the importance of recycling.
  2. Making paper can be used to learn about fiber and why it is a necessary part of a healthy diet. So, if you have a kid who is not keen on eating vegetables, paper-making is a simple artistic activity to get them interested in fibrous foods.
  3. Paper-making can help you declutter and recycle all that paper you have lying around.
  4. It is a multi-sensory activity.
  5. Making paper involves water which makes it extra fun for kids!
  6. Paper-making is an excellent activity choice for STEM, Montessori and Waldorf-style education.

MATERIALS

  • Recycled paper, envelopes, magazines, packaging
  • Compostable parts of fruit and vegetables (leafy vegetables like spinach, apple peals, avocado skin, anything you can think of, really. I once made cardboard from peanut shells).
  • Handmold (while on vacation, we improvised and used lemon mesh bags only for making small pieces of paper, but having a Handmold Papermaking Kit is easier).
  • Leaves, flowers, grass
  • Dishpan (we just use storage boxes)
  • Blender
  • Tray
  • Sponge
  • Cloth

INSTRUCTIONS

  • Tear small pieces of paper (or whatever you are using) – an equivalent of two sheets of 8.5″ x 11″ / A4
  • Place them in a blender with four cups of water and blend well.
  • Distribute pulp in water evenly. Kids love playing with water, so let them enjoy this process.hand-made paper Handmold Papermaking Kit
  • Dip the handmold and lift it up. Pulp will stick to the screen.hand-made paper Handmold Papermaking Kit
  • Let the water drain into the dishpan.
  • Set the handmold on a tray.
  • Gently remove the wooden frame.
  • Place a cover screen over the sheet.paper-making cover screen sponge
  • Use a sponge to get as much water out of the sheet as possible.
  • Gently remove the cover screen.
  • Put a piece of cloth on top of your sheet.
  • Flip everything over gently and lift off the grid.
  • Place a cloth over the sheet.
  • Repeat the process to make more paper.
  • Let your paper dry completely. It can take a day or two.

HELPFUL TIPS

  • Encourage your child to experiment with vegetables, fruit and plants. Explain to them which ones have more fiber. As an experiment, try using foods with less fiber or no fiber at all (like sweets) and see the difference.
  • If you are using the KonMari method for decluttering, when you get to the paper category, use this activity to recyle everything.
  • You can iron your sheets to make them flat.
  • To make your own handhold, use an old wooden frame and 2 pieces of flyscreen cut to size.
  • Collect plants and flowers to use in your hand-made paper.hand-made paper Handmold Papermaking Kit
  • Use flowers or pieces of paper to decorate the sheet while it’s still wet.
  • Once dry, encourage your child to use the paper they made for drawing, painting, writing, crafts, etc. This way the process of paper making will feel more complete in their minds.

hand-made paper with flowers and drawing

How does your child use their hand-made paper? Remember to tag me on Instagram as @Rainy.Day.Sunny.Play and use the #Rainy.Day.Sunny.Play hashtag. We love seeing your creations!

12 Safest Teething Toys

Sophie the Giraffe Usually, at around 3-4 months of age, your baby will start teething and putting everything in the mouth. Given the amount of time a baby spends doing this, it is imperative to have eco-friendly, organic objects to chew on. So, when offering teethers,  look for ones that don’t leach toxic, harmful chemicals into your baby’s mouth.

From my research I discovered that best organic / eco-friendly teethers were made from either rubber, woodorganic cotton or food grade siliconeAs there is no way of knowing in advance which one your baby will prefer, consider getting a handful for your baby to chose from. Also, different textures work best at different times of the teething process, so your baby might have a few favorite teethers.

WHICH TEETHING TOYS SHOULD YOU AVOID?

  • Any toy containing BPA, PVC/Plastic, Nylon or Polyester. BPA messes with hormones and the others are also linked to various health concerns, especially when used over long periods of time. So do your research before buying anything.
  • Old wooden toys or painted toys may contain lead. Cheap wooden teethers can have splinters. If in doubt, contact the manufacturer.
  • Teething biscuits can be a chocking hazard. If they are not organic and contain gluten, that can cause a myriad of gut issues as well.

WHY SHOULD YOU AVOID BPA-Free PLASTIC TOYS AND TEETHERS?

There are over a dozen different Bisphenols and BPA stands for only one type (Bisphenol A). So, if a product says “BPA-Free,” it’s just a marketing technique. What it really means is that the product uses another plastic instead. And since plastic uses petroleum, it can leach chemical.

RUBBER, WOOD OR ORGANIC COTTON  – WHAT’S THE DIFFERENCE?

  • Natural rubber is similar to plastic in its flexibility, but unlike plastic, it is biodegradable. It is, however, important to check that the rubber is natural. Otherwise it might still contain petroleum.
  • Sometimes babies need something harder to chomp, so untreated wood is the best option.
  • Organic cotton is versatile. It’s easy to wash and the toy designs are more interesting/visually stimulating. It can also be tied to make a harder part for the baby to chew on. When looking at cotton toys make sure the stuffing is also natural/organic.
  • Silicone is soft and can be recycled.

DIY TEETHERS

Try some of these home remedies before buying a teether:

  • Freeze an organic washcloth in a ziploc bag. Babies like the sensation of cold on their aching gums. The washcloth also provides an interesting texture for the baby to explore.
  • After 6 months of age, when food is introduced, you can try offering raw fennel or celery. It worked really well for us for a few months. However, keep in mind, that all food must be given under adult supervision as it can be a chocking hazard.
  • Wooden spatula or spoon – but only if it’s made from well sanded, untreated wood.

If none of these work, or you need safe on-the-go options, below is the list of the best ones out there.

(***Disclaimer: This post contains affiliate links, and if you decide to purchase anything from suggested links or companies, I may receive a commission. Recommended products are either things I love using or think would be helpful for you. Making your purchase using these affiliate links helps keep this site running, so thank you kindly!)

Hevea Panda Teether Freezer Safe Teether Set 5 Teething Keys Little Toader Teething Broccoli Momma Goose Organic Cotton Teether Organic Frenchy Fox Teething Rattle Organic Cotton Teether Manhattan Toy Skwish Maple Teether Montessori Organic Wood Toy Bag CaaOcho Rubber Teether Sophie the Giraffe

  1. Sophie the Giraffe – This is a smaller version of a classic French toy from 1960’s made from natural rubber of the Hevea tree. It has a particular scent which makes it so popular with babies. At first I thought that a giraffe with two rings  was very odd, but babies just love them and so did Adèle. It is small enough for tiny hands to grab and has a textured surface which babies find interesting. This teether is also hygienic and extremely easy to clean as it doesn’t have any holes (so no mould can form inside and dirt and bacteria can’t accumulate easily). When Adèle lost hers after a few months of use, we got her the original Sophie the Giraffe instead. The larger one has two advantages over the smaller one, however. It squeaks so thus appealing to all five senses. My only wish is that it didn’t have a hole into which water can enter. But if it didn’t, then there would be no sound so it’s a trade-off. Either way, you cannot go wrong with one or the either. Or, if you can’t decide, get both as they can be purchased as a set.Sophie the Giraffe 
  2. Hevea Panda Teether – Another teether made from sustainably produced natural rubber, Hevea Panda Teether is free of harmful chemicals mentioned above. For its protection, this teether is covered with a fine layer of vegetable oil, but you can rinse it off with boiling water. The surface of this teether is textured and it is small enough for babies to hold.  Like the above-mentioned Sophie, this teeter is also made of one piece of rubber, so no water can enter inside it.
  3. CaaOcho Rubber Teether – Made from a piece of certified non-toxic natural rubber, this hygienic teether has two types of textures for the baby to explore.
  4. Montessori Organic Wood Toy Bag – This is an excellent set inspired by Montessori philosophy. Adèle didn’t like all the wooden teethers in it (the ring was her favorite), but it is a good buy if you want your baby to have a variety of teethers to test. As I mentioned above, it is difficult to know which one the baby will like, so getting as set is an easy way to test more than one. This particular set is made from chemical free natural wood and is polished with an organic wood polish. The wooden peg dolls can be used by older children for imaginary, Waldorf-inspired play. Adèle made gnomes out of hers. ;)Peg dolls globe

  5. Maple Teether – This teether is unfinished and sanded smooth. For extra protection, you can cover it with organic olive oil after the baby is 6+ months old.
  6. Manhattan Toy Skwish – This rattle/teether/grasping toy is made from sustainable wood and finished with a water-based, non-toxic finish. Adèle didn’t play with it much, but it does look original as a decoration. Manhattan Toy Skwish 
  7. Organic Cotton Teether – This elephant teether is made from 100% organic, untreated cotton. It doesn’t use any dyes, but is more expensive than a lot of the other teething toys.

  8. Organic Frenchy Fox Teething Rattle – Another organic teether, this one is filled with sustainable, hypoallergenic corn fiber. Made by Apple Park Organic Toys, this fox is just one of their many teething toys. I find it very cute, but they also make an adorable moosecow and sheep among other things. 
  9. Momma Goose Organic Cotton Teether – This teether has a double advantage as it is made from two of our favourite materials – organic terrycloth and natural maple wood. A perfect Waldorf-style toy as it is very simple and non-representational.
  10. Little Toader Teething Broccoli – Made from food grade silicone and dyed with food safe colouring, this broccoli-shaped teether can be washed in a dishwasher. They also come in other food shapes like nopainapple and carrots.
  11. 5 Teething Keys – This is a set so it comes with 5 silicone teethers with various shapes and textures. They come with a 100% money back guarantee, so it’s a safe buy.
  12. Freezer Safe Teether Set – If your baby needs something cold to chomp on, this set of 5 is also safe to use as all the teethers are made from silicone. Like the above-mentioned set, they come with different textures and shapes.

Do you have a favorite safe teether which is not on my list? If so, please let me know so that I can add it.

Time Management for Busy Parents

Your children might not remember who fed them, but they will remember who played with them – the person who consistently spent focused, uninterrupted time with them. This is one of the many reasons why parent involvement in child development is so important.dsf1721

But playing with children does not always come naturally to adults. The repetative nature of child’s play is usually less appealing to adults and also quite tiring and time consuming. If this sounds like you or if you are looking for ways to stay present and engaged with your child, the first step is to set aside time.

HOW TO SET GOALS AND MANAGE YOUR TIME

Writing down your thoughts makes them more concrete and also helps sort out thoughts. So, take a pen and a piece of paper and ask yourself these 3 questions:

  1. What type of a parent do you want to be?
  2. How can you help your child best reach their potential?
  3. What are you naturally good at and how can you use that to engage with your child? (Think large and write down as many things – big or small – as you can think of. Examples can include things like “I am a good listener,” or “I can run fast,” or “I can make delicious sandwiches.” Everyone is naturally good at something, so think of at least one thing that you can jot down).

Once you have completed this exercise, it’s time to plan ahead. Don’t wait until the first of the month or until Monday. If you want to be a doer, then start NOW. dsf0668

HOW TO ACCOMPLISH YOUR GOALS

  • Start NOW
  • Based on your answers to the above questions, write down a list of activities you can do together with your child.
  • Plan out each day for 3 months. (According to science, it takes an average of 66 days to change any habit or create a new one.) Include one uninterrupted activity per day where you can be fully present. It can be as short as 10 minutes, but make it consistent and realistic for you. To help with this step, Download a FREE Printable Calendar I made for you.
  • Write everything down so that you can follow goals and know exactly what you are doing each day.
  • Find an accountability partner who can help you stay on track of your general goals. And for the activity – your child will most likely become your accountability partner as they get in the habit of doing the activity with you. 😉
  • Remember that there will be days when you won’t follow your schedule and that’s perfectly OK. The important thing is to continue with your goals and make them part of your routine.
  • Check off completed goals.

PLANNERS

If you prefer using digital planning tools, then ASANA is a FREE, easy to use online software which is great for goal setting. As a stay at home mother, I don’t usually have the possibility to sit in front of my computer, so I use a hard bound planner instead. If you are looking for one, here are my favorite ones:Law of Attraction Life Planner Live Whale Planner Panda Planner Passion Planner Gratitude Journal Happiness and Productivity

(***Disclaimer: This post contains affiliate links, and if you decide to purchase anything from suggested links or companies, I may receive a commission. Recommended products are either things I love using or think would be helpful for you. Making your purchase using these affiliate links helps keep this site running, so thank you kindly!)

  1. Panda Planner Classic – This 5.25 by 8.25″ hard cover daily goal and gratitude journal for happiness and productivity was designed using research from positive psychology and neuroscience. It has 185 daily pages, 12 months, and 26 weeks. The best part about it? – It does NOT have dates so you can start whenever you want!
  2. Law of Attraction Life Planner  – FCS Certified eco-friendly, weekly, happiness and productivity planner. You can find it dated or undated and it comes with a one year guarantee!
  3. Live Whale Planner – 8.3 x 5.5”, non-dated, beautiful leather bound agenda with 12 budget pages and made with 120 gsm thick paper (which means it can handle markers, pens, highlighters, etc). I love the whale design and the soothing royal blue color of the cover. Periodic inspirational quotes are also a plus.

I love to hear success stories, so please let me know if this goal setting exercise works for you!

3 Easy Preschooler Activities for When You Need Time to Yourself

HOW TO FIND A FEW MINUTES TO YOURSELF – OR DRINK A CUP OF COFFEE WITHOUT BEING INTERRUPTED 

Sometimes during the day you probably need at least a few minutes to yourself. When I really need a bit of quiet time (to drink my hot chocolate or just think for a minute), I ask Adèle for some “mommy time.” Now that she’s older, she understands what that means and makes up her own games while I rest. But when she was smaller, I would usually set up one of the activities listed below.

Because these activities involve a large quantity of the same thing, even small children should be able play independently for a while with a lot of focus and concentration. This way you won’t have to resort to using screens and your child will work on developing their senses while you rest!


KINESTHETIC ACTIVITY

Materials

  • Paper towel or toilet paper cylinders
  • Tape
  • 2 Container
  • Walnuts, small balls, beans or whatever yo have  – anything which would fit into the cylinders. *** Just make sure that the objects used are not a choking hazard and that your child is old enough to use such objects. ***

Instructions

  • Tape the cylinders to a surface which you won’t damage. Make sure your child can reach to the top. If you have many cylinders, be creative in how you attach them. Better yet, allow your child to experiment and attach them the way they choose.
  • Place one container underneath(for catching objects).
  • Place many objects into another container.
  • Show your child how to drop objects into the cylinders.

SENSORY ACTIVITY


Materials

  • Beans or rice or chickpeas or shelled nuts, etc. *** Once again, make sure that the objects used are not a choking hazard and that your child is old enough to use such objects. ***
  • 2 large containers
  • Water (optional)
  • Kitchen utensils like spoons, measuring cups – whatever you have on hand.

Instructions

  • Make sure that your child is old enough for this activity and that the objects you present do not pose a chocking hazard.
  • There are no rules. Your child will know what to do. Sensory Activity Beans Rice Nuts Find time to yourself Mommy Time Toddler Preschooler
  • Also, it can be used as a counting activity for older kids. 😉

KINESTHETIC / SENSORY ACTIVITY

***Disclaimer: This post contains affiliate links, and if you decide to purchase anything from suggested links or companies, I may receive a commission. Recommended products are either things I love using or think would be helpful for you. Making your purchase using these affiliate links helps keep this site running, so thank you kindly!

"I call this game fun-in-a-box." - Dr. Seuss from The Cat in the Hat. Child in a box. Kinesthetic Sensory Activity
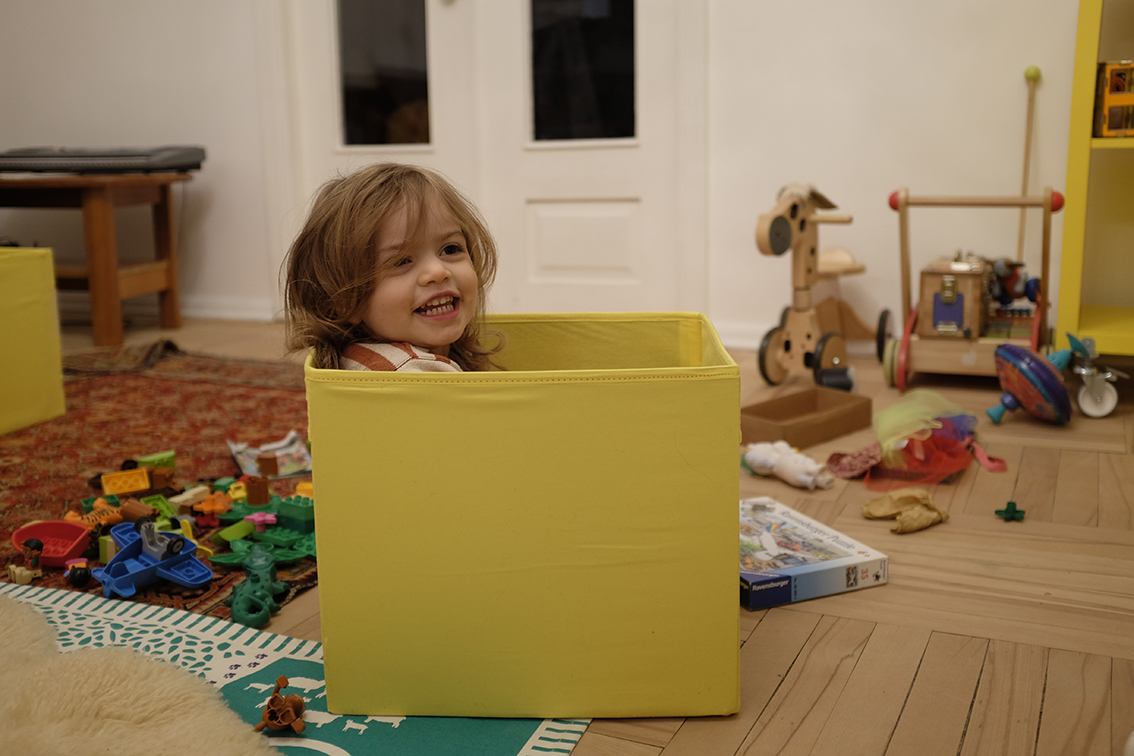
“I call this game fun-in-a-box.” – Dr. Seuss from The Cat in the Hat.

Materials

  • A box or a large container of any kind
  • Rice (optional) – and if you do use it, make sure that it is not a choking hazard and that your child is old enough for such activity. ***
  • Something to put under the mat so that when the rice spills, it will be easier for you to clean (optional).
  • Measuring cups and other kitchen utensils (optional)

Instructions"Not a Box" by Antoinette Portis child in a box Kinesthetic Sensory Activity Toddler Preschooler

  • Adèle loves the award-winning book “Not a Box by Antoinette Portis. Reading it inspires her to copy what the bunny is doing and to also create her own box games. Read the book together with your child and then give them a box to experiment with on their own.
  • You can put rice, beans or whatever you have at hand inside this box (if age appropriate). In this way it will become like a sandbox and your child can play inside it using measuring cups and other small containers.

What is your child’s favorite activity for independent play?


Simple Printmaking Projects for Any Age

Child Printmaking Monoprinting Plexiglass MÅLA Easel Long Sleeve Apron
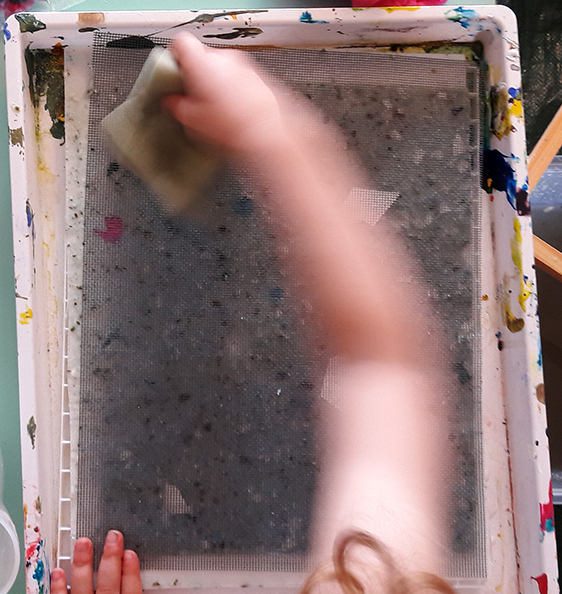
While living in Paris, France for two years, I was very lucky to be able to learn printmaking at the Ateliers Beaux-Arts. I wanted Adèle to try it one day, and it happened when one of our picture frames broke. We were left with a piece of plexiglass which needed to be up-cycled or repurposed, so it was the perfect time for printmaking.

WHAT IS PRINTMAKING? AND WHY IS IT IMPORTANT FOR YOUR CHILD?

Printmaking is the art of making art on something (usually paper). In today’s digital world, we see and make printed images every day. We use printers, read newspapers, look at ads and flyers as we walk around cities, etc. Something which is important or something which needs to be distributed, can be printed over and over again using various printing processes. The art of printmaking is a way to introduce your child to the idea of image reproduction in a simple, creative way._DSF6075

STEP-BY-STEP MONOPRINTING FOR BEGINNERS

While there are numerous printmaking techniques which exist, I find monoprinting to be the easiest to set up and execute at home, especially for younger children. Monoprinting is a printmaking technique in which an image can only be made once. The best thing is that, unlike other printmaking techniques, with monoprinting you don’t need a printing press nor any expensive tools! As you set up this activity, your child will experiment and understand by themselves what it’s about, just by doing it. The great thing about printmaking is that it’s surprising and fun. Just look at the photo above and see how surprised Adèle is when seeing her first print! So, let your child play and get lost in the activity, and maybe try it out yourself as well. It’s a great way to connect with your child through art ;). Here is what you will need, including instructions:

Materials

***Disclaimer: This post contains affiliate links, and if you decide to purchase anything from suggested links or companies, I may receive a commission. Recommended products are either things I love using or think would be helpful for you. Making your purchase using these affiliate links helps keep this site running, so thank you kindly!

  • Plexiglass or any other smooth, glossy surface – You can use plexiglass from old frames or an old placemat. Even if the surface is not smooth, it will still work. You can even use a cardboard. The advantage of plexiglass is that it can be wiped clean and used over and over again.
  • Paper – Make sure it’s smaller than the plexiglass. You don’t need anything expensive, but make sure that it’s thick enough so that it doesn’t buckle when wet with paint. Technically speaking you could use computer paper, but then the artwork won’t look as good and that might discourage your child from trying the activity again.
  • Organic Paint or Printing Ink.
  • Paint Brushes (if not using Organic Finger Paint).
  • Huck towels or microfibre cloths for wiping off the paint.

Instructions


  1. Place plexiglass on a clean, plain colored surface or a large piece of white paper.
  2. Allow your child to paint on the plexiglass.
  3. While the paint is still wet, hand them a piece of paper and have them put it on top.
  4. Show them how to press on top of the paper with their hands.
  5. Show them how to rub the paper all over with the palms of their hands.
  6. Show them how to, gently and slowly, lift up the paper.
  7. Voila, it’s finished.

To repeate the activity, have your child wipe off the glass and repeat all the steps above.

MONOPRINTING WITH OBJECTS

Another way to do this activity is to paint a flattened object and press the paper on top of it. Here is one I made using an aluminium soda can found on a busy road. It was flattened by car tires and had beautiful textures. So, instead of throwing it out, I decided to see what it would look like as a print. This is what came out of the experiment:Monoprinting Printmaking Coca Cola Can Object Red Black White
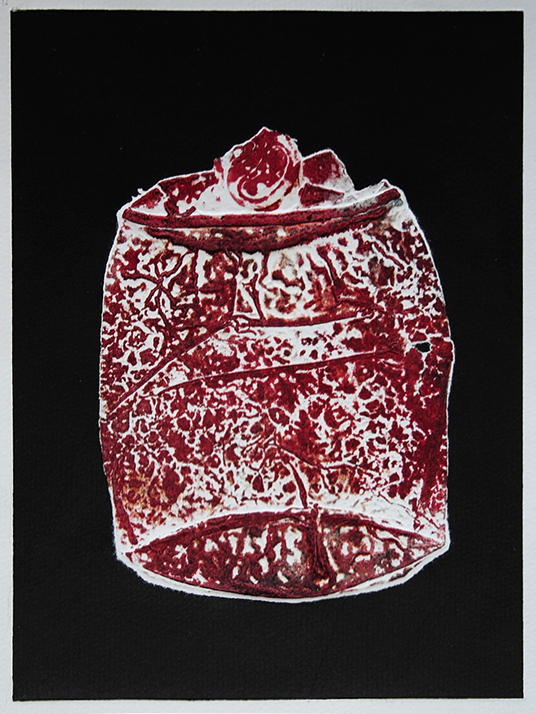
When you go out for walks with your kids, collect things of different textures (plastic, tree bark, nails, rocks, etc.) and then try using this printmaking technique. I am sure you will be pleasantly surprised. 😉 You can also try drawing/making marks on a styrofoam plate (or use these pre-cut Inovart Presto Foam Printing Plates which we use in our studio).


Please note that in order for the foam plates to work well, one must press a bit with a pencil to make deep marks. When Adèle used them for the first time when she was two, it was too difficult for her to press hard enough. At three, as she gained more arm and finger strength, she was able to do it well.

WHAT IS THE ADVANTAGE OF USING FOAM PLATES FOR PRINTMAKING?

The advantage of this technique is that it can replicate more intricate drawings. Foam plate can also be used over many times to make the same print (although individual prints will not be identical); and while I do not recommend it due to loss of quality, you can use both sides for printmaking. This would make them quite economical.

STEP-BY-STEP INSTRUCTIONS FOR USING FOAM PRINTING PLATES

  1. Draw on a styrofoam plate or a foam plates with a lead pencil. Press hard enough for groves to appear in the foam.
  2. Use a roller to roll paint (we use acrylic or tempera-like paint) over the drawing.
  3. While the paint is still wet, turn it over and place on top of a clean sheet of paper.
  4. Press gently and rub the paper all over with the palms of your hands.
  5. Gently and slowly, lift up the paper.
  6. Repeat and experiment. You can use different colors on the same plate, etc._DSF4510

Have you tried printmaking with your kids yet? What surface did you use? Remember to tag me on Instagram as @Rainy.Day.Sunny.Play and use the #Rainy.Day.Sunny.Play hashtag. We love seeing your creations!


BEST COLOR FOR CHILDREN’S ROOM: Expert Advice by Feng Shui Consultant & Best-selling Author, Karen Rauch Carter

***Disclaimer: This post contains affiliate links, and if you decide to purchase anything from suggested links or companies, I may receive a commission. Recommended products are either things I love using or think would be helpful for you. Making your purchase using these affiliate links helps keep this site running, so thank you kindly!***

MAKE FENG SHUI WORK FOR YOU

Every time we’ve moved in the last ten years, I carried one important book with me – Move Your Stuff, Change Your Life: How to Use Feng Shui to Get Love, Money, Respect, and Happiness by Karen Rauch Carter. The advice in this invaluable book has helped us live an adventurous life, find jobs, travel, fix problems and health issues, rescue animals, create, etc.  Even living in a castle was made a reality by following Karen’s advice!

I am extra excited to share this article that Karen was kind enough to write for you. It is specifically written with children in mind, but her books address ALL life situations and can help you solve the biggest problems with Feng Shui. So if this article speaks to you, read the book, move your stuff, and change your life now!

BEST COLOR CHOICES FOR YOUR CHILD’S BEDROOM by Karen Rauch Carter

It seems like a mom’s job is rarely done. Far more than the master bedroom, I get asked about the best feng shui colors to paint children’s bedrooms. So here are some top tips for children’s rooms!

Boy Room Feng Shui Green Photo by Karen Rauch Carter
Photo by Karen Rauch Carter

Although my one-on-one consultations take into account many specific things about a child before I suggest bedroom colors, if I were to generalize, I would at least suggest using a warm color. There are cool hues and warm hues of the same color. If you don’t know the difference, ask a professional in the paint department or a designer. A cold white is probably the hardest to counterbalance. If you rent and are forced to live in a cold white home, counterbalance this by hanging fabrics, or large pictures filled with very warm colors to cover as much cold white as possible.

Let’s get into specific colors (I’ll use the spectrum colors) and what energy qualities they promote:

RED

Red promotes physical activity, decisiveness, intensity, vigor, strength, sexuality, and materialism. Red is a grounding energy. Too much red can make your child more impulsive, emotionally stressed, and anxious.

ORANGE

Orange indicates a high-spirited personality, independent thinker, or entertainer. Orange is the color of festivity, parties, spontaneity and enthusiasm. Orange indicates a balance between the physical and spiritual, being unpredictable, expressive, and being in the moment. Orange may suggest spiritual leadership or religious focus. It can also help create boundaries.

YELLOW

Yellow represents wisdom, knowledge, art, joy, happiness, aspirations, inspiration, enlightenment and deep inner strength. Yellow is the color of optimism, analytical thinking, friends, popularity, intellectual stimulation, communications, reason and logic.

Boy Room Feng Shui Green Photo by Karen Rauch Carter
Photo by Karen Rauch Carter

GREEN

Green is a nurturing color, related to nature and plants. Green energy evokes restoration, healing, renewal, growth, relaxation, empathy, generosity, and love. Green is the color of retreat and sanctuary, balance and harmony.

BLUE

Blue is the color of the skies and oceans, and represents serenity, tranquility, patience, loyalty, imagination, honesty, sincerity introspection, writing, organizing, planning, drawing, architecture, and music. It is the color of mental clarity infinite truth and inner peace.

Boy Room Feng Shui Green Photo by Karen Rauch Carter
Photo by Karen Rauch Carter

INDIGO

Indigo represents reformation, truth seeking, idealism, reality, justice, science, education law, religion, government, philosophy and literature. Indigo evokes qualities of unity, obligation, dedication, devotion, discipline, and sincerity.

VIOLET

Violet is the color that activates spirituality, along with mystical, psychic, and clairvoyant abilities. It resonates with those who are visionary, highly intuitive and seekers of perfection.

Now, with that said, let’s proceed with my general recommendations:

HOW RIGHT COLOR CHOICES CAN HELP YOUR CHILDREN

  • I’d recommend green for an infant’s room as it promotes health, growth and balance.
  • If your child is showing signs of or has been diagnosed with ADD, or ADHD or generalized anxiety, consider a color in the yellow family. If you have a child that has a hard time concentrating on homework for example, place their homework on a yellow desk top or pad, so their eyes pick up yellow around the homework. This may help them focus. Definitely stay away from anything in the red family.
  • If your child wants to paint their room black, or is starting to show signs of “going goth,” it is symbolizing their inner reaching for identity. They are literally creating a void. It is akin to a pause in knowing their true identity. If the room ends up black, a lot of the light in the room will be absorbed. This can create an “excessive yin” condition according to feng shui principles, which may lead to depression and negative spiraling thoughts. A counterbalancing color to help maintain balance if the room ends up black is to add light fixtures, and allow as much natural light in as possible. Yellow is also a good counterbalancing color – hide it in the room – that can even help to restore balance.
  • I’d suggest yellow also for a child who is painfully shy, or acts out because of their inability to clearly communicate their needs (terrible twos or teens).
  • Any child prone to fevers, hot temper, or nervousness should avoid red. A person or child would have to show extreme imbalance in specific conditions (a severe lung condition, for example) for me to recommend a lot of red in a room. It is simply too active of a color to promote rest, health, and sleep. I’d say in general to keep red at a minimum in the bedroom.
  • A child on meds for bipolar issues, ADD, ADHD, or any other mental imbalance may be helped by a mint-type of green room.
  • A child prone to depression may need more light, and possibly the color orange may help. Avoid blues for this child.
  • I might suggest a blue room for a child that is showing signs of making poor ethic choices (shop-lifting, stealing, etc.) but I’d make sure it is a “happy blue” and not a dark, cool one that could exacerbate a blue mood.
  • An indigo or violet color may help balance a child that appears overly selfish, or is just a little too “into materialism.”
  • If your child has suffered any abuse, I’d recommend bringing in more of the color saffron orange. It will help restore healthy boundaries.

KAREN RAUCH CARTER

Karen Rauch Carter Feng Shui
Photo provided by Karen Rauch Carter

Karen Rauch Carter motivates audiences to rethink their day to day choices by implementing simple yet doable fixes for a vibrant life, home, health, relationship, planet and more. The best-selling author of the feng shui classic Move Your Stuff, Change Your Life, and Make a Shift, Change Your Life, Karen draws from years of experience in holistic arts, design, and personal development. For a complimentary webinar on how to position your furniture for success, visit www.MoveItWithKaren.com.


5 Simple, Fun & Educational Photo Activities for Kids Big and Small

Photography is a wonderful teaching tool. Through it, children can improve fine motor skills and learn valuable life lessons about patience, focus, editing, perspective, perseverance, timing, saving (not wasting) and decision-making.

Polaroid Pogo Printer Zip Paper ZINK Zero Ink PaperDIGITAL VS. ANALOG PHOTOGRAPHY

One of the biggest things that was lost when the digital camera was born is that we rarely print out pictures. Before, with analogue cameras, there was something magical about dropping off your negative film, waiting for it (sometimes for days), and then having a few precious photos. We didn’t click as mindlessly and quickly when taking photos. We thought more before clicking that shutter button because the roll of film was limited to a maximum of 36 frames. Now, with digital photography being so “limitless,” no one thinks about “wasting” photos anymore and it is also easy to delete unwanted moments.

Professional photographers take continues photos until they get that one, perfect shot. Most never wait for the “decisive moment” anymore – who has the time anyway, right? When digital cameras became available I was so sure I would never give up doing black and white, analogue photography. But once I tried, it was just so much easier. No more dust to deal with, no more scratched negatives to scan and edit. Now, with a click of a button, I could upload and print my photos at home. But I never did.

Because we take soooo many photos, they get lost in our phones, in our computers. Most never get printed – there are just too many to look through, too many to edit. Once again, most of us don’t have the time to look through hundreds of photos. That’s why when we take a photo we like, it gets immediately uploaded to social media. At least that way we manage to hold on to some moments.

Anyway, thinking about all of this, I wanted to find a way to make photography magical. I wanted to find ways for Adèle to have that same feeling I got when printing in the darkroom. I also wanted her to experience the basic process of photography. So, here are some of our favourite photo-related activities and I hope you try and enjoy them, too!

Camera Obscura1. CONVERT YOUR ROOM INTO A CAMERA OBSCURA.

Art historians have suggested that famous artists like the Maser of Light, Vermeer, used camera obscures to make paintings. A camera obscure means “dark room” in Latin and is a dark room with a hole on one side. Through this small hall, light enters and creates an image. It’s a natural phenomenon and is a wonder to see. Adèle’s room (pictured above) is a natural camera obscure. The blinds have a hole in them which allows the light to pass through. We see an upside down image of the buildings in front. The earliest camera obscures were caves. But don’t worry, you don’t need an old building nor a cave to make a camera obscure. All you need to do is block the light from all windows (you can use black trash bags, cardboard, old blankets, etc.) and make a hole (the size of a dime) in the middle. The smaller the hall the sharper the image will be. The larger the hall, the blurrier the image will appear. Once I made a camera obscure above a garage and could see people walking on my ceiling and cars driving by. Depending on where you live and what your windows look out at, it could be really fun to watch. Note, that since it requires a lot of sunlight, this activity works best on a bright, sunny day.

DIY Pinhole Camera2. MAKE A PINHOLE CAMERA.
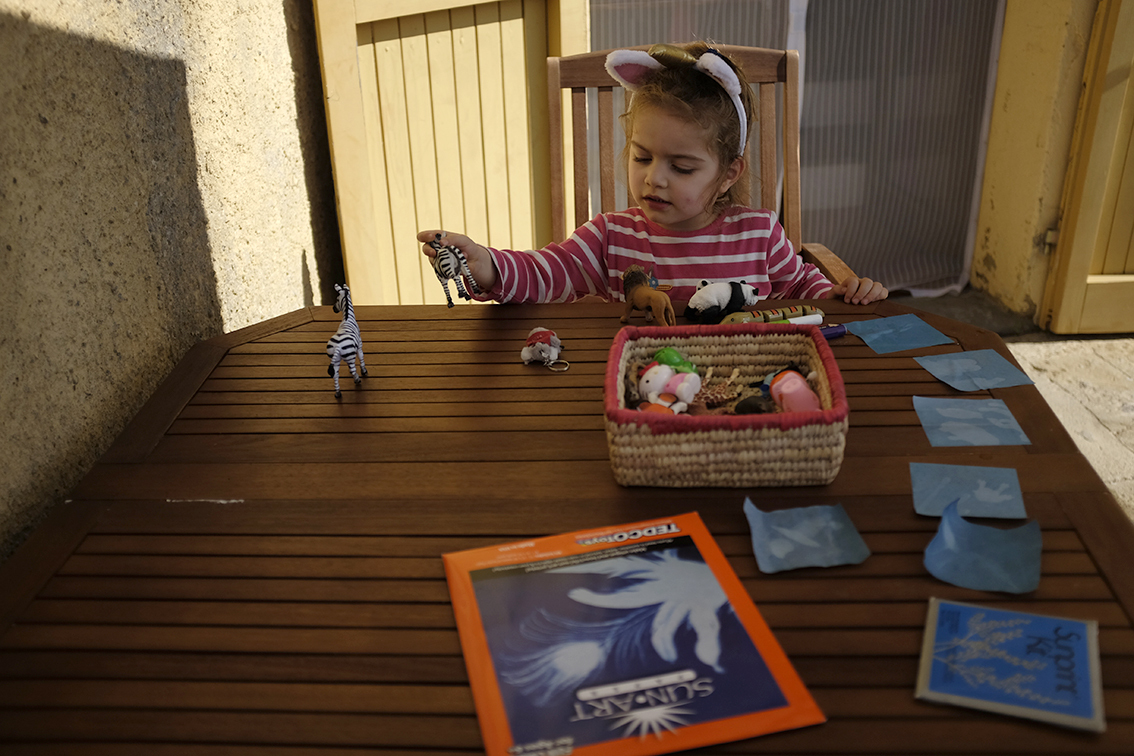
(***Disclaimer: This post contains affiliate links, and if you decide to purchase anything from suggested links or companies, I may receive a commission. Recommended products are either things I love using or think would be helpful for you. Making your purchase using these affiliate links helps keep this site running, so thank you kindly!)

A pinhole camera is the earliest type of a camera. It works in the same way as the camera obscure, but uses a dark box instead of an entire room. The idea is to make a hole the size of a pin (in my photography classes we, literally, used pins to make holes) and this is the hole through which the light will travel, making an image. It’s a simple principle of how vision and all cameras work. The light travels through your pupils and the images you see are turned right-side up by your brains. On store-bought cameras, the “hole” is the lens and the image is still created upside-down, just like your eyes do. The difference is that there is a mirror inside the cameras which flips the image right-side up.

Here is what you will need to make your own pinhole camera:

MaterialsDIY Pinhole Camera Xacto Knife Scissors Ruler Pencil Wax Baking Paper Washi Tape Shipskin Rug

  • A box that can close/open easily. One with a lid will be the easiest. Use a shoe box if you have one.
  • A well sharpened pencil (under adult supervision)
  • An X-ACTO Knife (under adult supervision – I do this part while Adèle watches.)
  • Child-frindly Scissors
  • Wax Paper (baking paper)
  • Washi Masking Tape (Any tape will work, but Adèle can tear off washi ones by herself and I try to provide her with things which encourage independence.)

Instructions for Making a Pinhole Camera

  • Punch a hole in one end of the box with the pencil.
  • Cut out a square on the opposite side of the box, across from the hole. The square should be around 5cm x 5cm.
  • Cut out a 8cmx8cm square out of the wax paper.
  • Tape the edges of the paper over the square hole.
  • Turn on a lamp in a dim room and stand, with the camera in from of the lamp.DIY Pinhole Camera
  • Hold the camera in front of you and look at the wax paper. You should see the upside-down lamp on the wax paper.
  • We tried looking at a window with blinds ajar and it worked. You just need to keep the camera steady. If you cannot make your room dark enough, then use a blanket to cover yourself and the camera (make sure the pinhole is not covered, though, otherwise light will not be able to enter it).

If you prefer to buy a DIY Pinhole kit that actually works with film, there are some great ones on the market. Here are the ones I like the best:

Pinhole Photography Kit 4M Pinhole Camera Green Viddy Pinhole Camera

  1. Pinhole Photography Kit – If your kids are old enough to work with chemicals, then you can make real pinhole photos with this Pinhole Photography Kit. It comes with everything needed to make your own camera and print them in a DIY darkroom!
  2. 4M Pinhole Camera Kit – This kit has all the pieces for assembling a plastic pinhole camera. It’s not for small kids and does not come with 35mm film but is more durable than cardboard pinhole models.
  3. Green Viddy Pinhole Camera – An eco-friendly DIY pinhole camera made from recycled card.   This one is one of the more expensive ones, but it’s very pretty and comes in 4 colours. Both 35mm and medium format film can be used so that’s a definitely plus.

Sunprint Kit Sun Art3. MAKE SUN PRINTS.

Sun Prints Sun Art Sunprint Kit Plants Rocks Flower

Sun Prints are perfect for any age. I have so much with them myself and it’s marvellous every single time. Sun Art Paper is a special paper which undergoes a chemical change when exposed to sunlight. Making sun prints is an excellent activity for nature walks and camping. It challenges the imagination to create unique silhouettes with found objects.


The sheet of included plexiglass helps hold the objects flat. You can even draw on it with Chalk Markers!


Alternatively, you can draw on a transparency.


If you add some lemon juice to the water while rinsing the print, it will make the photo more vivid. Because this paper is light sensitive, it is important to keep it away from light (do NOT expose it to any light) before placing objects on it.

Polaroid Pogo Printer Zip Paper ZINK Zero Ink Paper Greeting Card
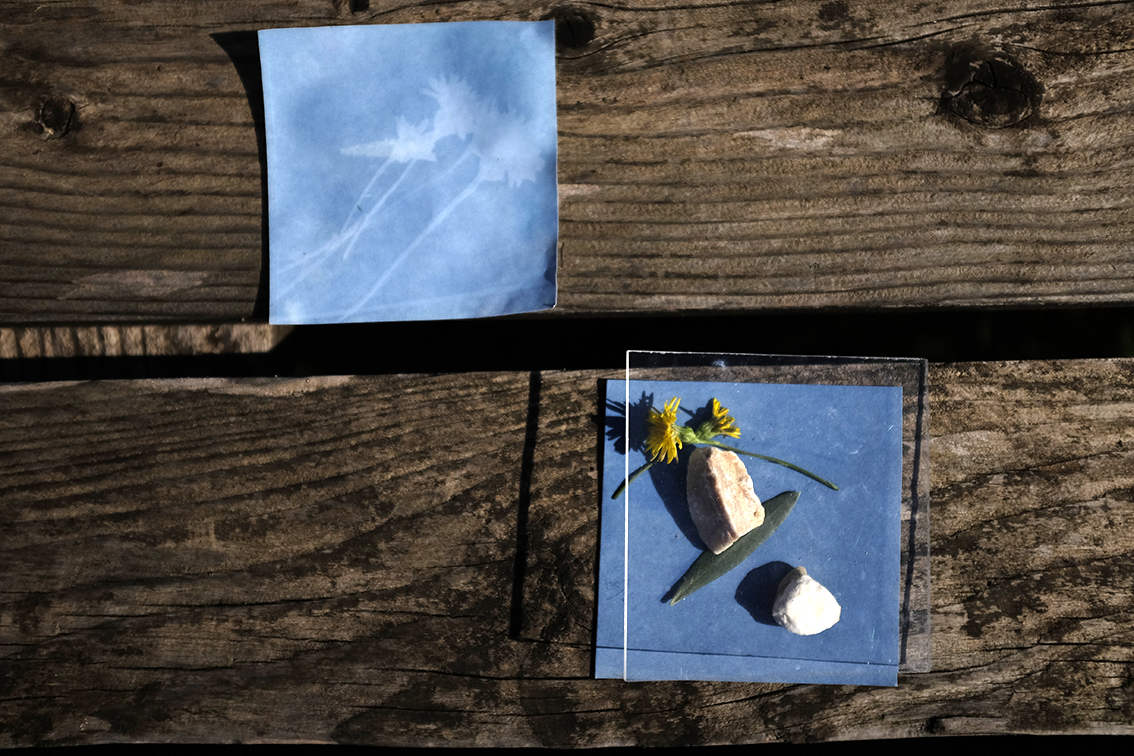
4. INSTANT CAMERA FUN.

There are 4 great things about instant cameras:

  1. They are easy to use (which is a great thing for kids). All your child needs to do is to simply point the camera at something and press the shutter button. The instant camera does all the rest.  There is no focusing involved (something difficult for small children to grasp) and no printer to connect to. The camera adjusts the exposure and prints a photo in seconds after the shot is taken.
  2. There is a limit to how many images you can make (because you are paying for each piece of paper) so it makes you stop and think more. It forces you to decide if the shot is really wroth taking. You won’t be clicking away, wasting film the way you do with a phone camera, for example.
  3. Watching the image you just took come out of the camera is mesmerising. Usually you can’t preview the photos you took and the image gets printed right away, which is the nostalgic, fun part about this equipment. Instant cameras don’t produce high resolution images – that’s not the point. However, there are a wonderful teaching tool for budding photographers and they can be used to teach children about patience, about not wasting (paper, money), about editing and decision-making.
  4. Some of instant cameras these days print photos with a sticky backing which means that they can be used like stickers. As children usually like stickers, it is a unique way to allow them to create their own. And, just to be clear, instant camera means that NO ink is involved – you just need to buy the paper. This is why I looked at photo paper prices when researching instant cameras. Some cameras might cost more, but the paper is less expensive which might actually be a better deal than buying a cheaper camera with more expensive paper. Other things to consider are features and built-in capabilities. So, if you also want to try using an instant camera, here are top three to choose from:

Insta Cameras Fujifilm Instax Mini 90 Polaroid PIC-300 Polaroid Snap Instant Digital Camera 

  1. Fujifilm Instax Mini 90 (black or brown)
    • Fun possibilities include double exposure (taking 2 images in 1 photo), build mode (making it possible to photograph light trails), macro photography (for taking photos of bugs and leaves ;)), kid mode (for taking photos of people and fast moving things).
    • Print size is approximately that of a credit card.
    • Photos are printed from the camera within seconds, so no preview is possible.
    • Least expensive paper costs $0.61 per sheet (if you buy 60 sheets for $36.57).
  2. Polaroid PIC-300 (available in a variety of colours)
    • Durable and easy to use.
    • Print size is approximately that of a business card
    • Photos are printed from the camera within seconds, so no preview is possible.
    • Least expensive paper costs $1 per sheet (if you buy 20 sheets for $19.99).
  3. Polaroid Snap Instant Digital Camera (available in a variety of colours)
    • A compact camera with fun modes such as black and white or vintage (like the old Polaroid photos).
    • 2×3″ prints have an adhesive back which is fun for kids’ art activities.
    • Micro SD card allows the images to be viewed and saved digitally.
    • Least expensive paper costs $0.50 per sheet (if you buy 20 sheets for $9.97).

Polaroid Pogo Printer Zip Paper ZINK Zero Ink Paper
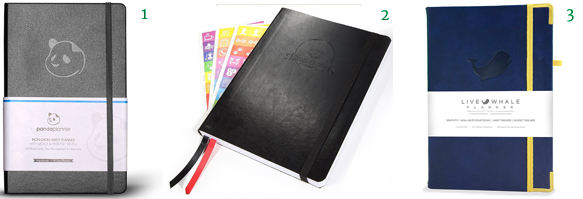
Another way to have tangible prints in your hands is to use portable printers which are so small they can fit into your pocket. The following are my top three picks:

Portable Printers Polaroid PoGo Instant Mobile Printer Polaroid ZIP Mobile Printer HP Sprocket Portable Photo Printer

  1. Polaroid PoGo Instant Mobile Printer – I bought an older model of this printer almost 11 years ago. It works perfectly. The film expired in 2009 so I thought it wouldn’t work, but it does! The best part is that it has an adhesive backing so Adèle can use it in her artwork (see below). And with a USB plug, it can print photos from almost any device that allows USB printing.
  2. Polaroid ZIP Mobile Printer – If you want to use your mobile phone or bluetooth technologies, then this is the printer for you. Like other polaroid instant cameras and printers, it uses the same sticky paper.
  3. HP Sprocket Portable Photo Printer – This printer also uses bluetooth and can be linked to social media accounts. It comes with many modern-time add-ons such as emojis, borders, etc.,  It is not for our family since Adèle is allowed zero screen time and we limit our personal screen time to work and Skype. However, I have heard good things about this printer and since HP is known for making quality products, I put it on this list. 

Polaroid Pogo Printer Zip Paper ZINK Zero Ink Paper
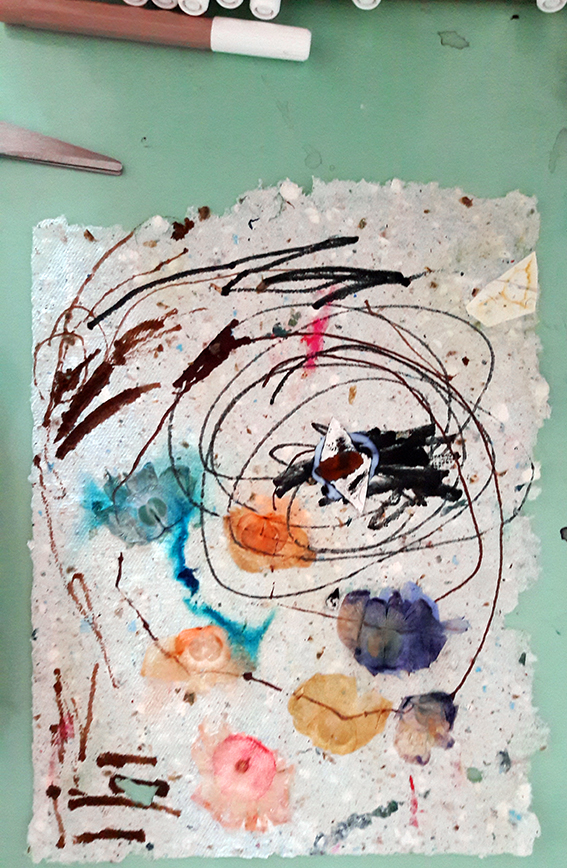
Here Adèle is waiting to catch her photos as they print. She likes making blurry photographs, sticking them to canvas boards and painting on top.

Polaroid Pogo Printer Zip Paper ZINK Zero Ink Paper PaintingsSometimes Adèle uses sand and rubs photos to change their texture and color. She also likes to watch the chemical reaction which occurs when she applies paint on top of the photos. The color changes as she wipes it with a cloth, paper towel, or wooden fork/knife.  Sometimes she also sticks them to dry paintings. Possibilities are limitless.

20993131_10155629819004282_1570192653_o5. PHOTOGRAPHY BOOKS FOR KIDS.

Reading about photography is, of course, an excellent way to get children interested in image-making. I have yet to find a good photography book aimed at toddlers and preschoolers (please let me know if you find one!), but here are some fantastic ones for older kids:

Photography Books Seeing Things: A Kid's Guide to Looking at Photographs Go Photo! An Activity Book for Kids Photo Adventures for Kids: Solving the Mysteries of Taking Great Photos 

  1. Seeing Things: A Kid’s Guide to Looking at Photographs – Adèle’s best friend gave her this beautiful book as a gift. It is aimed at older kids, but even at 2 she enjoyed looking at all the photos. The photos chosen for this book (like  Henri Cartier-Bresson’s iconic “Man Jumping Over Puddle” or Mary Ellen Mark’s portrait of the circus elephant) are child-friendly and intriguing and invite questions. I didn’t read all the text when Adèle was younger, but simplified the ideas so that she could understand it at her age. Overall, this is our favourite book for introducing kids to photography.
  2. Go Photo! An Activity Book for Kids – This book shows 25 fun, creative photo-related activities kids can do in different settings/situations. Not all activities require an actual camera. The book is written in a friendly language and is easy to follow.
  3. Photo Adventures for Kids: Solving the Mysteries of Taking Great Photos – This book teaches how to look for special moments to make great photos anywhere and everywhere. It comes with a cutout “viewfinder” which helps kids learn about composition. It is meant for older kids to read by themselves by encouraging them to “solve the mystery of photography” through various games, assignments and challenges.

What are your favorite photo-related activities? Have you found kid-friendly equipment which you think I should add to my lists?

Design a site like this with WordPress.com
Get started